
How to Connect Your OpenClaw Agent to Every Social Platform Using Postiz
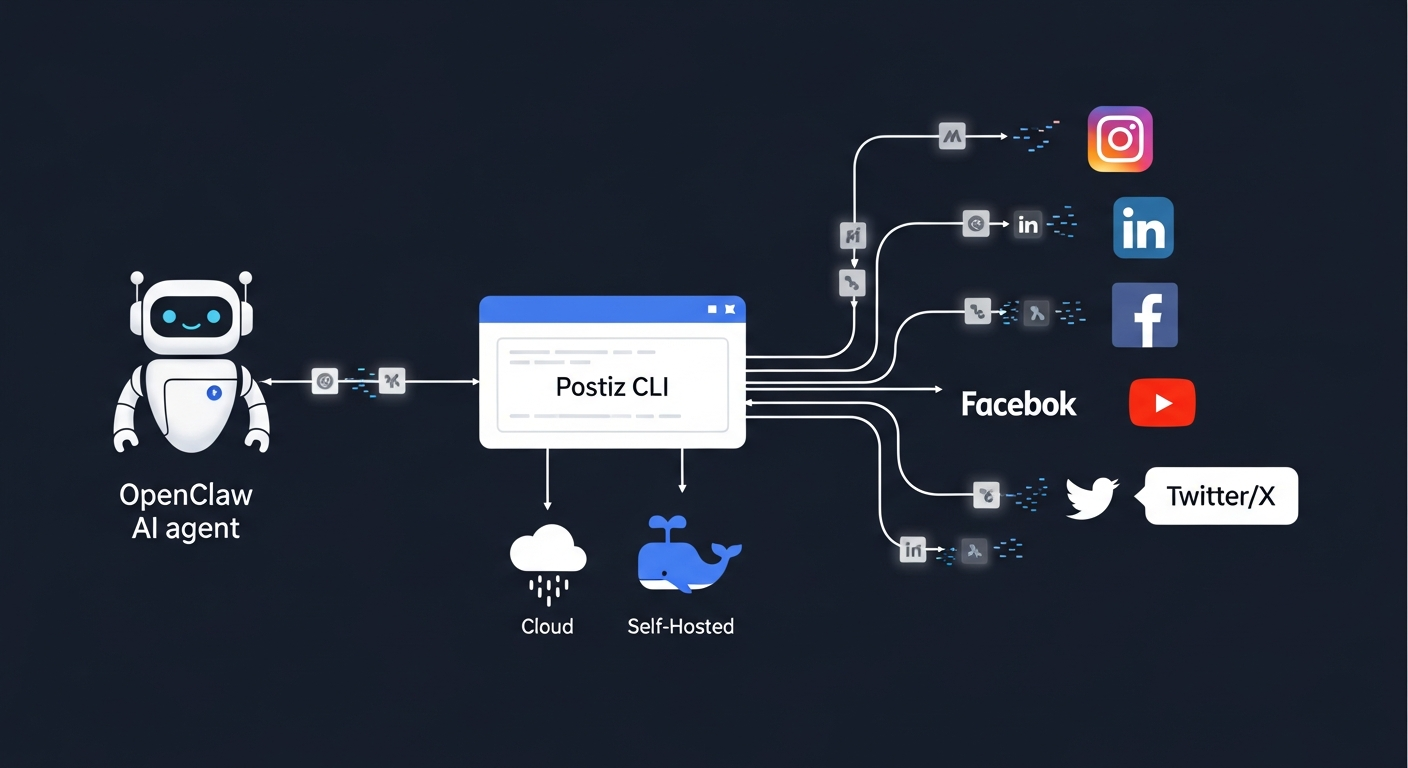
Your AI agent can write. It can research. It can code. But can it post to Instagram, LinkedIn, Twitter, Facebook, and YouTube — all from one command? With Postiz, yes.

You built an OpenClaw agent. It’s smart. It knows your brand voice, can draft compelling content, and runs 24/7. But the moment you want it to actually post something to social media, you hit a wall. Each platform has its own API, its own OAuth flow, its own quirks. Instagram needs a Business account and uploaded media. Twitter requires OAuth 1.0a for image uploads. LinkedIn has separate scopes for personal profiles and company pages. YouTube demands video uploads before you can publish.
Postiz solves this by putting a single CLI between your agent and 30+ social platforms. One API key. One set of commands. Structured JSON output that your agent already knows how to parse.
This tutorial walks you through connecting your OpenClaw agent to the five platforms that matter most — Instagram, LinkedIn, Facebook, YouTube, and Twitter/X — using Postiz as the bridge. We researched official Postiz documentation, platform-specific provider guides, community discussions, and real GitHub issues to give you accurate, tested instructions.
What Is Postiz?
Postiz is an open-source social media scheduling platform with over 15,000 GitHub stars and 4.79 million Docker downloads. Founded by Nevo David in September 2024, it was built with two principles: everything is open source, and you only pay for cloud costs.
What makes Postiz different from Buffer or Hootsuite for AI agents is its dedicated CLI tool. While competitors focus on web dashboards, Postiz built postiz — an npm package that returns structured JSON from every command, includes a SKILL.md file for automatic OpenClaw discovery, and is designed from the ground up for programmatic access.
The basics:
- Cloud version: Free tier at postiz.com — handles OAuth flows for you
- Self-hosted: Docker Compose, completely free, requires configuring your own OAuth apps
- CLI:
npm install -g postiz— the interface your agent uses - Platforms: Instagram, LinkedIn, Facebook, YouTube, Twitter/X, TikTok, Reddit, Bluesky, Mastodon, Threads, Pinterest, Discord, and 15+ more
Prerequisites
Before you connect any platform, you need three things in place.
1. OpenClaw Running
If you haven’t installed OpenClaw yet:
npm install -g openclaw@latest
openclaw onboard --install-daemon
This runs the setup wizard, configures your AI provider (Claude, GPT, or local models), and starts the gateway daemon.
2. Postiz CLI Installed
npm install -g postiz
Verify it’s working:
postiz --help
3. Postiz API Key
If using the cloud version (recommended for getting started):
- Create an account at postiz.com
- Go to Settings in the Postiz dashboard
- Generate an API key
- Set it as an environment variable:
export POSTIZ_API_KEY=your_api_key_here
If self-hosting:
export POSTIZ_API_KEY=your_api_key_here
export POSTIZ_API_URL=https://your-postiz-instance.com
For persistence, add both to your shell profile (~/.zshrc or ~/.bashrc).
Configure OpenClaw to Discover the Postiz Skill
OpenClaw needs to know about Postiz. Add the skill to your configuration:
// ~/.openclaw/openclaw.json
{
  "skills": {
    "entries": {
      "postiz": {
        "enabled": true,
        "env": {
          "POSTIZ_API_KEY": "your_api_key_here"
        }
      }
    }
  }
}
Or install it from ClawHub:
clawhub install nevo-david/postiz
Once configured, your agent automatically knows what Postiz can do — it reads the SKILL.md and understands every available command.
The Universal Workflow
Every platform follows the same pattern. Once you internalize this, connecting a new platform takes minutes:
- Connect the platform in the Postiz web dashboard (OAuth flow)
- Discover — your agent runs
postiz integrations:listto see connected accounts - Prepare — upload media if needed with
postiz upload - Post — create content with
postiz posts:create
Let’s walk through each platform.
Connecting Instagram
Setup time: 10 minutes (cloud) | 30 minutes (self-hosted)
Instagram through Postiz supports feed posts, stories, and reels. There are two connection methods: Facebook Business-linked and Standalone.
Cloud Setup
- In the Postiz dashboard, go to Integrations > Instagram
- Choose your connection type:
- Instagram (Facebook Business): Requires a Facebook Page linked to your Instagram Business account
- Instagram Standalone: Only needs a Professional Instagram account (Business or Creator)
- Complete the OAuth flow — authorize Postiz to post on your behalf
Self-Hosted Setup
For the Facebook Business path, you need the same Meta app used for Facebook (see the Facebook section below). Add to your .env:
FACEBOOK_APP_ID=your_app_id
FACEBOOK_APP_SECRET=your_app_secret
For Standalone Instagram, create a separate Instagram app at developers.facebook.com:
INSTAGRAM_APP_ID=your_instagram_app_id
INSTAGRAM_APP_SECRET=your_instagram_app_secret
Posting to Instagram
Instagram requires media to be uploaded first — you can’t post text-only content.
Feed post with image:
# Upload image first
RESULT=$(postiz upload photo.jpg)
IMAGE_URL=$(echo "$RESULT" | jq -r '.path')

# Create the post
postiz posts:create \
  -c "Your caption here #hashtags" \
  -m "$IMAGE_URL" \
  -s "2026-02-20T10:00:00Z" \
  --settings '{"post_type":"post"}' \
  -i "your-instagram-integration-id"
Instagram Story:
postiz posts:create \
  -c "" \
  -m "$IMAGE_URL" \
  -s "2026-02-20T10:00:00Z" \
  --settings '{"post_type":"story"}' \
  -i "your-instagram-integration-id"
Reel:
VIDEO_RESULT=$(postiz upload video.mp4)
VIDEO_URL=$(echo "$VIDEO_RESULT" | jq -r '.path')

postiz posts:create \
  -c "Reel caption" \
  -m "$VIDEO_URL" \
  -s "2026-02-20T10:00:00Z" \
  --settings '{"post_type":"reel"}' \
  -i "your-instagram-integration-id"
With collaborators:
postiz posts:create \
  -c "Collab post!" \
  -m "$IMAGE_URL" \
  -s "2026-02-20T10:00:00Z" \
  --settings '{"post_type":"post","collaborators":[{"label":"partner_username"}]}' \
  -i "your-instagram-integration-id"
Instagram Gotchas
- Professional account required: Personal Instagram accounts have zero API access since Meta killed the Basic Display API in December 2024. Switch to Business or Creator (free, takes 30 seconds in Instagram settings).
- Media upload mandatory: Every Instagram post needs at least one image or video. The Postiz upload step isn’t optional.
- Known reposting bug: GitHub issue #832 documents a bug where Standalone Instagram posts sometimes aren’t marked as PUBLISHED, causing the scheduler to repost the same content in a loop. Workaround: use the Facebook Business-linked path instead, which is more stable.
Connecting LinkedIn
Setup time: 5 minutes (cloud) | 20 minutes (self-hosted)
LinkedIn supports both personal profile posting and company page posting — but these are separate integrations with different OAuth scopes.
Cloud Setup
- In Postiz, go to Integrations > LinkedIn (for personal profile) or LinkedIn Page (for company pages)
- Authorize through OAuth
- For company pages, you must have admin access to the page
Self-Hosted Setup
Create a LinkedIn app at linkedin.com/developers:
LINKEDIN_CLIENT_ID=your_client_id
LINKEDIN_CLIENT_SECRET=your_client_secret
Important: You must add the “Advertising API” product to your LinkedIn app and fill out the request form. This is required for token refresh functionality. Without it, your tokens will expire and posts will fail silently.
OAuth redirect URLs:
- Personal:
https://your-domain/integrations/social/linkedin - Company Page:
https://your-domain/integrations/social/linkedin-page
Posting to LinkedIn
Standard text post:
postiz posts:create \
  -c "Just shipped a new feature. Here's what we learned building it." \
  -s "2026-02-20T09:00:00Z" \
  -i "your-linkedin-integration-id"
Image carousel (slides):
postiz posts:create \
  -c "5 lessons from launching our AI agent platform:" \
  -m "slide1.jpg,slide2.jpg,slide3.jpg,slide4.jpg,slide5.jpg" \
  -s "2026-02-20T09:00:00Z" \
  --settings '{"post_as_images_carousel":true}' \
  -i "your-linkedin-integration-id"
Posting as a company page:
Use the LinkedIn Page integration ID (different from personal). You can discover it with:
postiz integrations:list
Look for the entry with "identifier": "linkedin-page".
LinkedIn Gotchas
- Personal vs Page scopes: If self-hosting, personal profiles only need
openid,profile,w_member_socialscopes. Company pages need additional organization-level scopes that require LinkedIn API access approval. A PR #1134 fixing scope separation is pending review. - Token refresh: Without the Advertising API product enabled on your LinkedIn app, tokens expire after 60 days. The Postiz dashboard will show the integration as “disconnected” with no clear error message.
Connecting Facebook
Setup time: 5 minutes (cloud) | 25 minutes (self-hosted)
Facebook posting through Postiz targets Facebook Pages, not personal profiles. This is a Meta API restriction — personal profile posting is not available through any official third-party API.
Cloud Setup
- In Postiz, go to Integrations > Facebook
- Authorize with your Facebook account
- Select which Facebook Page(s) to connect
- Grant the requested permissions
Self-Hosted Setup
Create a Meta app at developers.facebook.com:
- Create a new app under a Business Portfolio
- App type: select Other
- Add the following permissions/scopes:
pages_show_listbusiness_managementpages_manage_postspages_manage_engagementpages_read_engagementread_insights
- Switch the app from “Development” to Live mode (required for public posting)
FACEBOOK_APP_ID=your_app_id
FACEBOOK_APP_SECRET=your_app_secret
OAuth redirect URL: https://your-domain/integrations/social/facebook
Posting to Facebook
Text post to a Facebook Page:
postiz posts:create \
  -c "Exciting update from our team! We just launched..." \
  -s "2026-02-20T12:00:00Z" \
  -i "your-facebook-integration-id"
Post with image:
postiz posts:create \
  -c "Check out our latest product update" \
  -m "product-screenshot.jpg" \
  -s "2026-02-20T12:00:00Z" \
  -i "your-facebook-integration-id"
Facebook Gotchas
- Pages only: You cannot post to personal Facebook profiles via the API. Only Pages are supported.
- Live mode required: The Meta app must be in Live mode. In Development mode, only test users can see your posts.
- Same app for Instagram: If you’re also connecting Instagram via the Facebook Business path, you use the same
FACEBOOK_APP_IDandFACEBOOK_APP_SECRET. No need to create a second app.
Connecting YouTube
Setup time: 10 minutes (cloud) | 30 minutes (self-hosted)
YouTube through Postiz handles video uploads with titles, descriptions, tags, privacy settings, and thumbnail support.
Cloud Setup
- In Postiz, go to Integrations > YouTube
- Authorize with your Google account
- Select your YouTube channel
Self-Hosted Setup
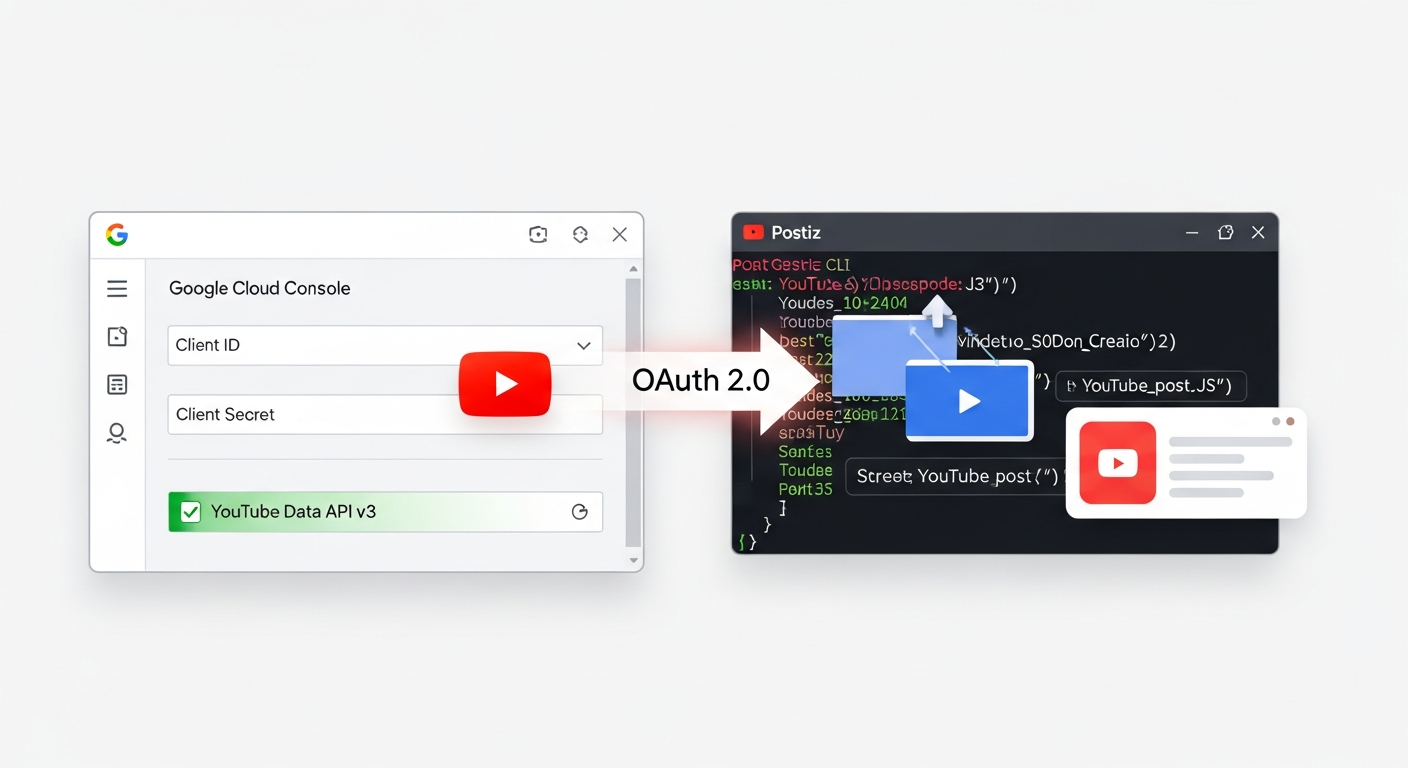
Set up OAuth 2.0 credentials in the Google Cloud Console:
- Create a new project (or use an existing one)
- Enable these APIs:
- YouTube Data API v3
- YouTube Analytics API
- YouTube Reporting API
- Create OAuth 2.0 Client ID (type: Web Application)
- Add authorized redirect URI:
https://your-domain/integrations/social/youtube
YOUTUBE_CLIENT_ID=your_client_id
YOUTUBE_CLIENT_SECRET=your_client_secret
For brand accounts: Set the OAuth consent screen to “External” and trust the app via admin.google.com > Security > API Controls. Trust propagation takes approximately 5 hours.
Posting to YouTube
Videos must be uploaded first, then referenced in the post creation:
# Upload video
VIDEO_RESULT=$(postiz upload my-video.mp4)
VIDEO_URL=$(echo "$VIDEO_RESULT" | jq -r '.path')

# Publish to YouTube
postiz posts:create \
  -c "Full video description here with links and timestamps" \
  -m "$VIDEO_URL" \
  -s "2026-02-20T15:00:00Z" \
  --settings '{
    "title": "How We Built an AI Agent That Posts to Social Media",
    "type": "public",
    "selfDeclaredMadeForKids": "no",
    "tags": [
      {"value": "ai", "label": "AI"},
      {"value": "automation", "label": "Automation"},
      {"value": "openclaw", "label": "OpenClaw"}
    ]
  }' \
  -i "your-youtube-integration-id"
Privacy options for the type setting:
"public"— Discoverable through search and recommendations"unlisted"— Only accessible with direct link"private"— Only visible to you
YouTube Gotchas
- Video upload required: You can’t create a YouTube post without a video file. The content (
-cflag) becomes the video description. - Supported formats: MP4 is the safest bet. MOV also works.
- Brand account delay: If using a YouTube Brand Account, Google’s trust propagation for the OAuth app takes ~5 hours. Don’t panic if it doesn’t work immediately.
Connecting Twitter/X
Setup time: 5 minutes (cloud) | 15 minutes (self-hosted)
Twitter/X supports simple posts, threads, media attachments, and configurable reply permissions.
Cloud Setup
- In Postiz, go to Integrations > X (Twitter)
- Authorize with your Twitter/X account
- You’re done — Postiz handles the developer app credentials
Self-Hosted Setup
Create a developer app at developer.twitter.com:
- Sign up for a developer account (free tier works for basic posting)
- Create a new App
- Set App permissions to Read and Write
- Set App Type to Web App, Automated App, or Bot
- Add callback URL:
https://your-domain/integrations/social/x
X_API_KEY=your_consumer_key
X_API_SECRET=your_consumer_secret
Why OAuth 1.0a? Twitter’s OAuth 2.0 doesn’t support image uploads. Postiz uses OAuth 1.0a for write operations. This is a Twitter limitation, not a Postiz design choice.
Posting to Twitter/X
Simple tweet:
postiz posts:create \
  -c "Just deployed our AI agent to handle social media. The future is now." \
  -s "2026-02-20T14:00:00Z" \
  -i "your-twitter-integration-id"
Thread (multiple tweets):
postiz posts:create \
  -c "Thread: 5 things I learned building an AI agent that manages social media 🧵" \
  -c "1/ The hardest part isn't the AI. It's the OAuth flows. Every platform handles auth differently." \
  -c "2/ Instagram requires media on every post. No text-only content allowed via API." \
  -c "3/ LinkedIn has separate scopes for personal profiles and company pages." \
  -c "4/ YouTube needs video uploaded before you can create a post." \
  -c "5/ The solution? Use a unified tool like Postiz that handles all the platform quirks for you." \
  -s "2026-02-20T14:00:00Z" \
  -d 2000 \
  -i "your-twitter-integration-id"
The -d 2000 flag sets a 2000-minute delay between thread tweets. Adjust or remove for faster posting.
With reply permissions:
postiz posts:create \
  -c "Announcement: We're hiring AI engineers." \
  -s "2026-02-20T14:00:00Z" \
  --settings '{"who_can_reply_post":"followers"}' \
  -i "your-twitter-integration-id"
Options: "everyone", "followers", "mentioned".
Twitter/X Gotchas
- Shared API credentials: All Twitter accounts connected to your Postiz instance share the same
X_API_KEY/X_API_SECRET. This means they share rate limits too. If you’re posting from multiple accounts, you’ll hit limits faster (GitHub #1016). - Free tier limits: The free X API tier allows ~500 posts/month with write-only access. No reading tweets, no analytics. For read access, you need the $200/month Basic tier.
- Public URL required: Twitter’s OAuth flow requires a publicly-accessible callback URL. You can’t complete the self-hosted setup on
localhost.
Multi-Platform Posting: The Power Move
Here’s where Postiz shines. Once all your platforms are connected, posting to multiple channels is a single command:
postiz posts:create \
  -c "We just launched our AI social media agent. Here's how it works:" \
  -m "launch-graphic.jpg" \
  -s "2026-02-20T10:00:00Z" \
  -i "twitter-id,linkedin-id,facebook-id,instagram-id"
One command. Four platforms. Your agent handles it in seconds.
For platform-specific customization in the same post, use the JSON file approach:
postiz posts:create --json multi-platform-post.json
Where multi-platform-post.json contains per-platform content variations, settings, and media.
Letting Your Agent Do It All
Once everything is connected, your OpenClaw agent can manage your entire social media presence autonomously. Here’s what a typical interaction looks like:
You: “Schedule a LinkedIn post for tomorrow at 9am about our new feature release. Also post a shorter version to Twitter.”
Your agent:
- Runs
postiz integrations:listto find your LinkedIn and Twitter integration IDs - Drafts platform-appropriate content (long-form for LinkedIn, concise for Twitter)
- Runs
postiz posts:createwith the LinkedIn ID, scheduling for 9am - Runs
postiz posts:createwith the Twitter ID, adapting the content
You: “What’s my engagement looking like this week?”
Your agent:
postiz analytics:platform your-linkedin-id -d 7
postiz analytics:platform your-twitter-id -d 7
Returns follower growth, impressions, and engagement metrics for the past 7 days.
You: “Create a content campaign: post to all platforms every Tuesday and Thursday for the next month.”
Your agent can schedule all 8 posts in advance, customizing content for each platform’s best practices.
Self-Hosting Postiz (Optional)
If you want full data control, self-host Postiz with Docker Compose:
git clone https://github.com/gitroomhq/postiz-docker-compose
cd postiz-docker-compose
Configure your .env file with at minimum:
# Core
MAIN_URL=https://your-domain.com
FRONTEND_URL=https://your-domain.com
NEXT_PUBLIC_BACKEND_URL=https://your-domain.com
JWT_SECRET=generate-a-random-string-here
DATABASE_URL=postgresql://postiz-user:password@postiz-postgres:5432/postiz-db
REDIS_URL=redis://postiz-redis:6379
BACKEND_INTERNAL_URL=http://localhost:3000
TEMPORAL_ADDRESS=localhost:7233
IS_GENERAL=true
STORAGE_PROVIDER=local
UPLOAD_DIRECTORY=/uploads
NEXT_PUBLIC_UPLOAD_DIRECTORY=/uploads

# Social platforms (add as needed)
X_API_KEY=
X_API_SECRET=
LINKEDIN_CLIENT_ID=
LINKEDIN_CLIENT_SECRET=
FACEBOOK_APP_ID=
FACEBOOK_APP_SECRET=
YOUTUBE_CLIENT_ID=
YOUTUBE_CLIENT_SECRET=
INSTAGRAM_APP_ID=
INSTAGRAM_APP_SECRET=
Then launch:
docker compose up -d
Access the dashboard at http://localhost:4007.
Minimum requirements: 2GB RAM, 2 vCPUs. Validated on Ubuntu 24.04.
Cloud vs Self-Hosted Decision:
| Factor | Cloud (postiz.com) | Self-Hosted |
|---|---|---|
| Setup time | 5 minutes | 30-60 minutes |
| OAuth handling | Automatic | Manual (create apps per platform) |
| Data control | Postiz servers | Your infrastructure |
| Cost | Free tier / paid plans | Free (hosting costs only) |
| Maintenance | Zero | You manage updates |
| Best for | Getting started fast | Full control, privacy-first |
Troubleshooting Common Issues
“No integrations found” when running postiz integrations:list
- You haven’t connected any social accounts in the Postiz web dashboard yet. The CLI only reads/writes — platform connections happen through OAuth in the web UI.
Posts not appearing on the platform
- Check that the scheduled date is in the future (ISO 8601 format, UTC timezone)
- For self-hosted: verify the Temporal workflow engine is running (
docker compose logs temporal) - Known issue: “Post now” with a past date fails silently (GitHub #1176)
Instagram posts appearing multiple times
- This is a known Standalone Instagram bug. Switch to the Facebook Business-linked Instagram integration for stability.
“Invalid API key” on self-hosted Instagram Standalone
- Documented in GitHub #1122. Ensure your
INSTAGRAM_APP_IDandINSTAGRAM_APP_SECRETare from a properly configured Meta app with the correct redirect URIs.
Twitter: rate limit errors
- All Twitter accounts share one set of API credentials. Space out your posts or upgrade to a paid X API tier.
Quick Reference: All Environment Variables
| Platform | Cloud Needed? | Self-Hosted Variables |
|---|---|---|
| Twitter/X | No | X_API_KEY, X_API_SECRET |
| No | LINKEDIN_CLIENT_ID, LINKEDIN_CLIENT_SECRET |
|
| No | FACEBOOK_APP_ID, FACEBOOK_APP_SECRET |
|
| Instagram (Business) | No | Same as Facebook |
| Instagram (Standalone) | No | INSTAGRAM_APP_ID, INSTAGRAM_APP_SECRET |
| YouTube | No | YOUTUBE_CLIENT_ID, YOUTUBE_CLIENT_SECRET |
| Postiz API | Always | POSTIZ_API_KEY, POSTIZ_API_URL (self-hosted only) |
What’s Next
With Postiz connected, your OpenClaw agent becomes a social media manager that never sleeps. It can draft content matched to each platform’s best practices, schedule posts at optimal times, track engagement analytics, and adjust strategy based on what’s working.
The pattern extends beyond these five platforms. Postiz supports TikTok, Reddit, Bluesky, Mastodon, Threads, Pinterest, Discord, and more — all through the same CLI your agent already knows. Connect one, connect them all.
If you’re running your agent on Augmi, the Postiz skill integrates directly with your deployed OpenClaw agent. Add your POSTIZ_API_KEY to your agent’s configuration, connect your social accounts in the Postiz dashboard, and your agent is ready to post to the world.
Built with OpenClaw and Augmi. Published via Postiz.